Snippets Commands
Monday, February 20, 2023
12:43 PM
Snippets are bits of content that can be inserted onto a page and provide repeatable and standardized elements that make editing easier and faster.
My Snippets
OneNote comes with pre-defined snippets listed below. But you can create new snippets from your own custom content using the My Snippets commands.
Save New Snippet
Saved the selected content as a new custom snippet with its own name and adds it to the My Snippets menu.
If the snippet contains the exact text {SNIPPET_BODY}, including the curly braces, then that token is replaced with selected content on the page, if there is a selection. Otherwise, the snippet will be inserted exactly, without any substitutions.
Snippets can also contain a special tag to insert the current date/time: {=DATETIME(format)} where format is a valid .NET DateTime format string. Standard formats are described here. Custom formats are described here.
Here are examples of a couple of common formats you can use.
|
Snippet Tag |
Description |
Example |
|
{=DATETIME(f)} |
Full date and time |
Saturday, October 25, 2025 8:14 AM |
|
{=DATETIME(dd-MMM-yyyy)} |
Date |
25-Oct-2025 |
|
{=DATETIME(MMMM dd, yyyy)} |
Long date |
October 25, 2025 |
|
{=DATETIME(T)} |
Long time |
8:17:00 AM |
Manage My Snippets
Open the Settings dialog where you can rename or delete saved snippets.
Expand Snippet From Name
Default shortcut is Alt + F3
While you can insert a snippet from the Snippets/My Snippets menu, a quicker solution is to type the name of a snippet, select the name, and then press Alt + F3. This will immediately replace the selected name with the contents of the snippet.
|
────────────────────────────────────────────────────────────────────────────────────────────────────
Below are the standard snippets provided by OneMore, listed in the order in which they appear in the menu.
Status
Insert colored status labels similar to the Status macros found in Confluence. These are not as smart as the Confluence macros but instead are just simple text with a highlight background that are fully editable inline.
STATUS STATUS STATUS STATUS STATUS
Breadcrumb
Adds a breadcrumb at the top of a page specifying its hierarchical location in the notebook. If the page is moved, this command will update the breadcrumb or re-add it if it was subsequently removed.
Calendar
Inserts a monthly calendar for a selected month in either large or small format. The small format is good for a quick look at a month. The large format is good for entering brief daily notes.
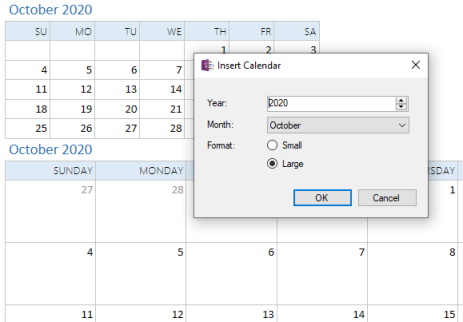
The Indent calendar option will indent the calendar beneath the header, allowing the header to be collapsed
Double Horizontal Line
Adds a double-width horizontal line below the current paragraph
Horizontal Line
Adds a horizontal line below the current paragraph
Sortable Date
Default shortcut is Ctrl + Shift + D
Inserts the current date in the form yyyy-mm-dd. One common use case is to prefix the title of a new page with the current date so it is easy to sort and visually identify pages according to the entered date.
Emoji
Inserts one or more selected emojis. The emojis are symbols selected from the Segoe UI Emoji font. One recommended use is to prepend your page title with an emoji, which will then show up in the page panel for quick identification.
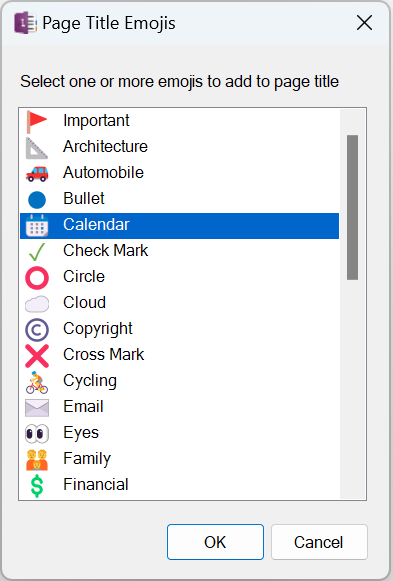
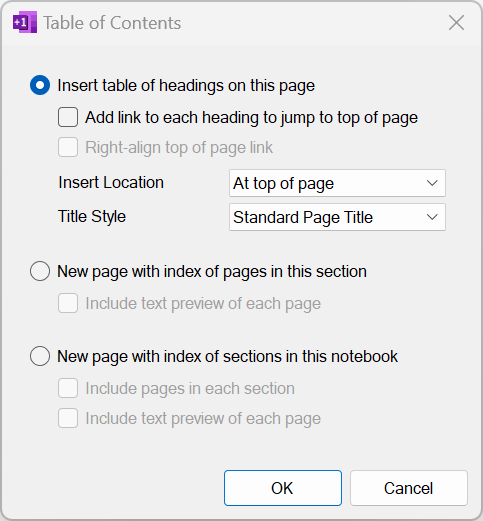
Table of Contents
The Table of Contents command can run in one of three modes:
- Insert a table of contents at the top of the page with hyperlinks to all the standard and custom headings on the page. Optionally, add a "top of page" link to each heading on the page to quickly jump back to the top of the page. Click the [Refresh] link to rebuild the table of contents, picking up any changes made to the page since it was last generated.
- Create a new page at the top of the section with hyperlinks to all pages in the current section
- Create a new page at the top of the section with hyperlinks to all sections in the current notebook and optionally include all pages in each section.
Generates a Table of Contents based on both standard headings and custom user-defined headings where each line is hyperlinked to its heading and indented according to its heading level. Text colors are based on the page background color.
Table of Contents
. . Heading 2
. . . . Heading 3
|
Code Box
Default shortcut is F6
Inserts a code box with heading and area for your code. Use the Paste Rich Text command to paste syntax-highlighted code directly from Visual Studio1. By default, text colors are based on the page background color.
To wrap content already on the page, select the content before clicking this command or pressing F6. The selected content will be wrapped inside a new code box. If the background color of all of the selected text is dark and the page background is light then the shading of the code box is set accordingly; similar if the background color of all of the selected text is light and the page
background is dark.
|
Code |
|
/// <summary> /// Close this file and release internal resources. /// </summary> protected virtual void Dispose(bool disposing) { if (disposing) { if (!isDisposed) { if (writer != null) { writer.Flush(); writer.Dispose(); writer = null; }
isDisposed = true; } } } |
If text copied from Visual Studio is pasted as plain text instead of rich text when using the Paste Rich Text command (Ctrl+Alt+V) then look at the VS Tools... Options... Text Editor... Advanced, and tick the box Copy rich text on copy/cut.
Text Box
Default shortcut is Alt + F6
Insert a single-cell table. To surround content already on the page, select the content before invoking this command. This table cell will shrink to the size of the selected content if it is not as wide as the page.
Info, Notes, and Warning Boxes
Inserts an information, Notes, or Warning box with fully customizable headers and content. These snippets are actually just nested tables.
To surround content already on the page, select the content before invoking one of these commands.
|
|
|
Expand/Collapse
Inserts a collapsible section at the current position on the page. This can be used to hide secondary or sensitive information on your page. This snippet includes a single-cell table to which you can add content.
|
|
|
#omwiki #omcommands
© 2020 Steven M Cohn. All rights reserved.
Please consider a sponsorship or one-time donation to support ongoing development
Created with OneNote.