My Styles Commands
Monday, February 20, 2023
9:44 AM
The built-in OneNote styles are defined by OneNote and cannot be changed. The My Styles commands lets you create and edit your own styles. These are saved and appear in the My Styles gallery. Just like the OneNote styles, each style in the My Styles gallery can be applied to selected text. You can also apply all styles in the gallery to the current page, where it will attempt to match your content to an appropriate style in the gallery.
|
Styles Gallery |
Styles Editor |
|
|
|
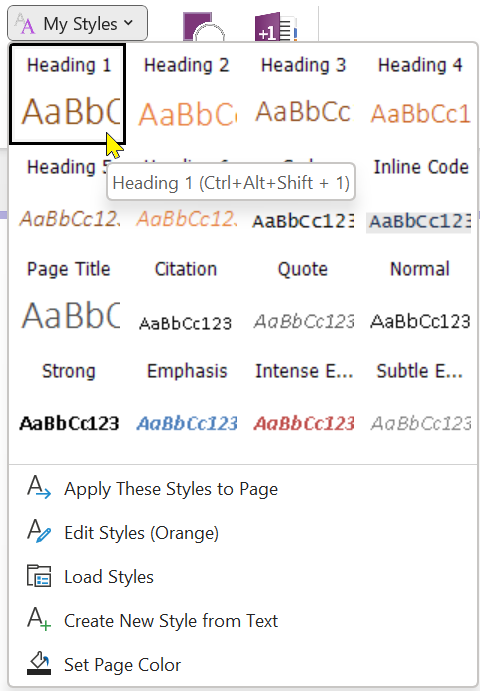
The first nine styles are automatically bound to the key sequences Ctrl+Alt+Shift + 1 through Ctrl+Alt+Shift + 9. You can override these key bindings in the Settings dialog. You can also define command aliases for use in the Command Palette.
Note that styles are applied aggresively. Appying a custom paragraph style to a normal paragraph will override any specially stylized words or phrases within that paragraph, setting the whole paragraph to your custom style.
Apply These Styles to Page
Default shortcut is Ctrl + Alt + S
Applies My Style styles to the current page. This attempts to intelligently map each style to the content. Any content styled with the standard OneNote headings will be converted to My Styles defined as a heading. All other content will be styled based on inferred styling and closest match to a defined My Style.
Edit Styles
Edits styles in the My Styles gallery.
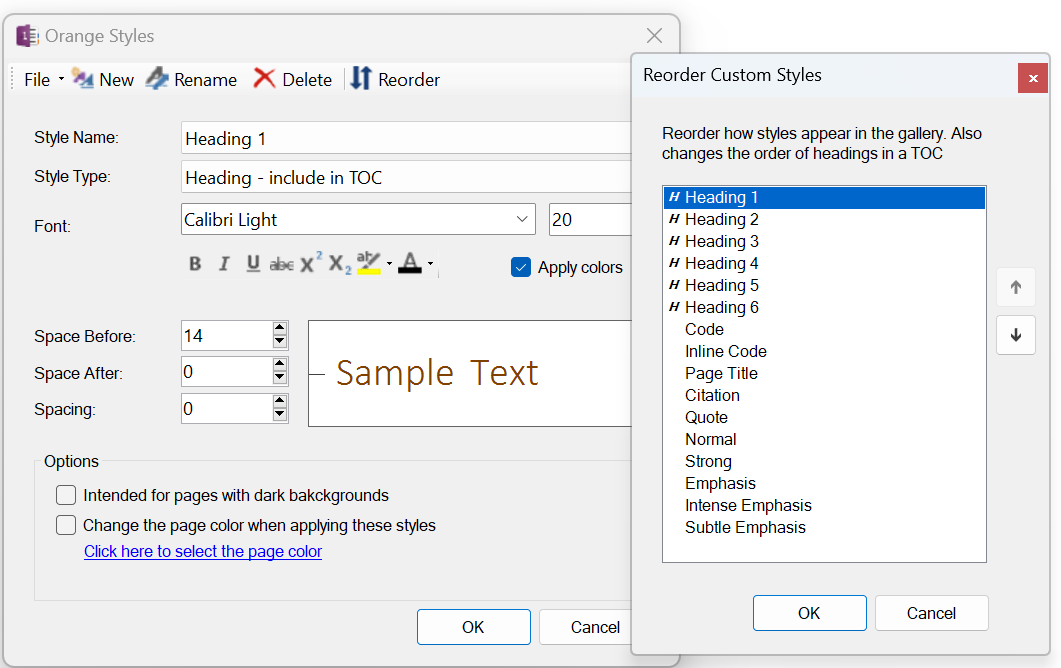
Load Styles
The styles in the My Styles gallery are stored as XML files. Each XML file defines one set of styles. When you load an XML file, its file name is displayed in the Edit Styles command, for example "Orange" in the picture above.
Loading a new XML file will entirely replace the current styles in the gallery. Only one set can be loaded at a time.
Create New Style from Text
Open the style editor, detecting the style attributes of the currently selected text.
Set Page Color
Changes the page background to a custom color.
────────────────────────────────────────────────────────────────────────────────────────────────────
Regarding Heading Styles and The Next Paragraph
There is a known problem that appears to be a glitch in the way OneNote works. OneNote will automatically switch to a normal paragraph immediately following a heading line. But this doesn't work as expected when applying a OneMore custom heading style.
While it may appear to work correctly as you press Enter after custom heading:
This is a custom Heading 2
This looks like a normal paragraph but it is not!
Internally, the paragraph is actually a stylized Heading 2. There is no known solution to this at this time. But there is a workaround. After typing a custom heading and pressing Enter, immediately press Ctrl + Shift + N to force the Normal style on the next paragraph.
────────────────────────────────────────────────────────────────────────────────────────────────────
Regarding The Office Black Theme and Custom Page Backgrounds
By default, OneNote lets you select from a light, pastel palette for page backgrounds but it if you change the Office theme to Black then it does a fairly decent job of colorizing your content and the OneMore custom styles work just fine.
But if you don't want to affect all Office products then OneMore offers true dark-mode background capabilities as well as custom page color selections. And OneMore comes with a style theme named DarkStyles.xml that you can load.
There is a known issue regarding how OneNote converts colors when switching between light mode and dark mode.
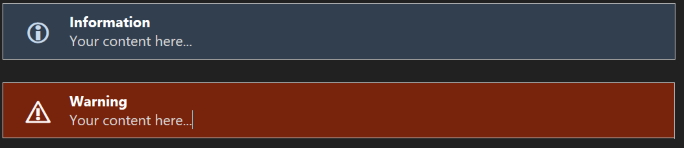
If you've selected a darker page background color, OneMore will generate the information box, warning box, and code box with darker colors as well, such as:
#omwiki #omcommands
© 2020 Steven M Cohn. All rights reserved.
Please consider a sponsorship or one-time donation to support ongoing development
Created with OneNote.